

|
Page 3 of 7
|
| Author |
Message |
xiphmont
Clued up

Joined: 28 Mar 2009
Posts: 69
Location: Somerville, MA USA

|
 Modifying the stock HP10/11 cartridges
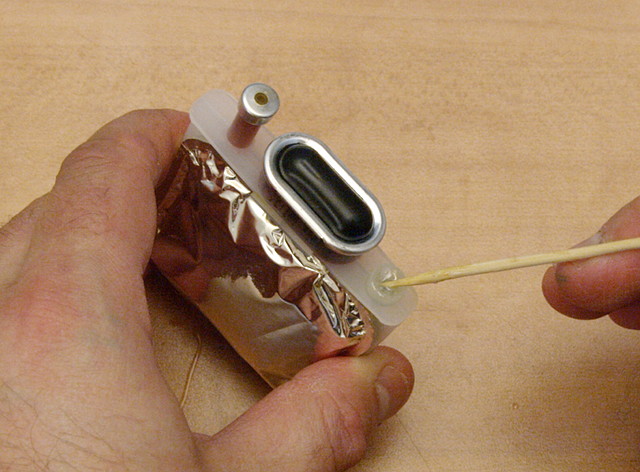
Fill the ink injection port with epoxy as well over the plug. Dye inks tend to be very thin and get through even fairly tight stoppers. All of the HP11 cartridges I opened showed evidence of some ink getting past the stopper, so epoxying this shut too makes sense.
This glue is thick and doesn't run/sag so there's no problem applying it to both the fitting and ink port, then setting the cartridge aside to cure.
|
| Sun Mar 29, 2009 9:03 am |
   |
|
xiphmont
Clued up
Joined: 28 Mar 2009
Posts: 69
Location: Somerville, MA USA
|
Modifying the stock HP10/11 cartridges
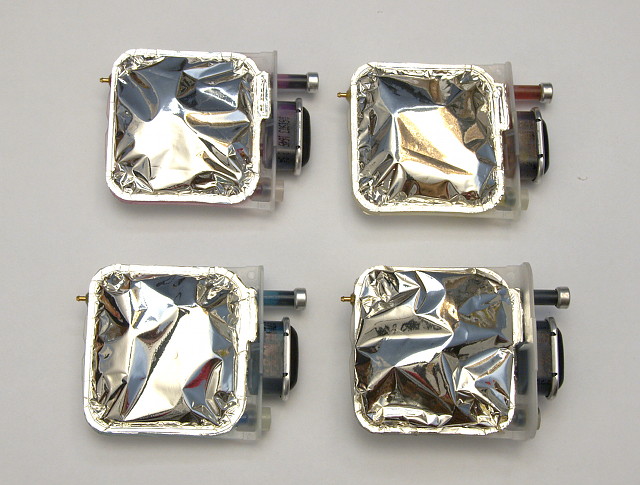
Repeat for all four catridges. Success! The hardest / most annoying / most likely to go horribly wrong part is finished.
|
| Sun Mar 29, 2009 9:05 am |
|
|
xiphmont
Clued up
Joined: 28 Mar 2009
Posts: 69
Location: Somerville, MA USA
|
Modifying the stock HP10/11 cartridges
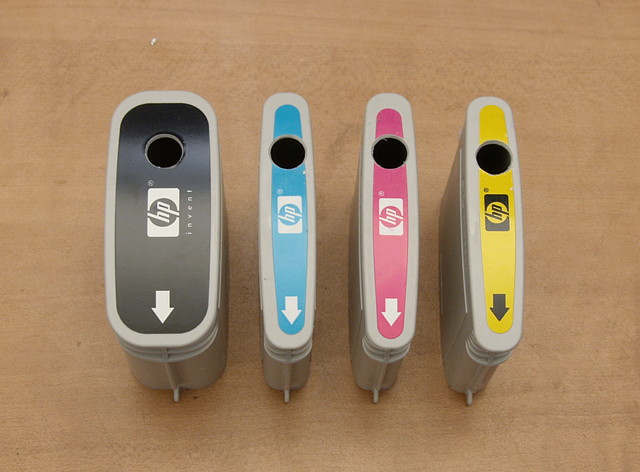
The original cartridge bodies will need new openings at the top for the fittings. a 1/4" or 3/8" Forstner bit makes a nice clean hole.
|
| Sun Mar 29, 2009 9:07 am |
|
|
xiphmont
Clued up
Joined: 28 Mar 2009
Posts: 69
Location: Somerville, MA USA
|
Modifying the stock HP10/11 cartridges
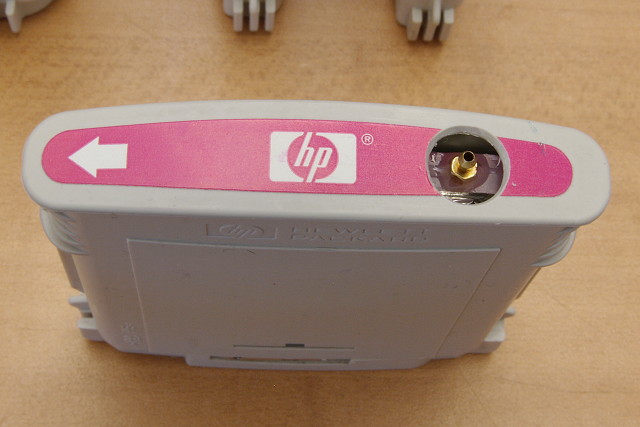
After the epoxy on the ink pouches cures, reassemble!
OK, that's alot of photoediting and posting for one night. Reservoirs come next in a few days!
Monty
|
| Sun Mar 29, 2009 9:09 am |
|
|
Martin
Site Admin

Joined: 30 Apr 2002
Posts: 4132
Location: South Yorkshire, UK
|
 
Wow! That is one seriously impressive set of instructions..
I see now what you mean about the fittings although I do know from experience that the key issue I had was drilling through the bag which was a right pain in the patookis.
I think I'll have to give this glue of yours a try though with my own approach... I've just opted to change the tubing I've been using for a Tygon R3605 lab type of 1/32" ID coupled with the elbow fittings I noted in the other thread.
My approach is via the filling port and as you guessed it's easy enough to manage if you slice off the raised part around that area. That said the space available under there is very tight so I'm playing with a way to remove an additional 1mm of depth around the fill hole. That would allow the fitting to sit lower and gain more clearance.
Obviously it'd be easier to explain with pictures but having seen this epoxy I think it's going to be worth a small investment as a trial run to see if it's better than the thread locker I got and do it all properly with pictures then 
Now I need to find a UK supplier for that epoxy...
_________________ Printers: (Canon) MP500/830, MX700, iP4000/4200/4300/4500/5200, iX4000(A3) (Epson) C84/86, D88, CX6600, R285/800/1900 (HP) K550, K850, K5400, L7680
|
| Sun Mar 29, 2009 10:31 pm |
    |
|
xiphmont
Clued up
Joined: 28 Mar 2009
Posts: 69
Location: Somerville, MA USA
|
I can't seem to respond... whenever I quote your message to reply I get a 'you have used a banned word' error.... It isn't 'patookis' I already tried removing that one ;-)
Monty
|
| Sun Mar 29, 2009 10:49 pm |
|
|
xiphmont
Clued up
Joined: 28 Mar 2009
Posts: 69
Location: Somerville, MA USA
|
Martin wrote:Wow! That is one seriously impressive set of instructions..
I see now what you mean about the fittings although I do know from experience that the key issue I had was drilling through the bag which was a right pain in the patookis.
I blew into the bag through the ink port to puff it out as far as it would go, resealed it, then drilled. Doing it all very slowly by hand, I had all the control I needed, and I'm 8 for 8 so far. I should probably add that to the instructions. The pictures for that part are 'staged' so the bag had already deflated a bit.
Quote:
I think I'll have to give this glue of yours a try though with my own approach... I've just opted to change the tubing I've been using for a Tygon R3605 lab type of 1/32" ID coupled with the elbow fittings I noted in the other thread.
My approach is via the filling port and as you guessed it's easy enough to manage if you slice off the raised part around that area. That said the space available under there is very tight so I'm playing with a way to remove an additional 1mm of depth around the fill hole. That would allow the fitting to sit lower and gain more clearance.
I tested that idea out on a scratch cartridge, and even trimming flush to the frame it looked like it would be a very tight fit. If I used a striaght adapter, the tubing didn't have clearance to bend without kinking, and with an elbow, it looked like I couldn't screw it down because it would hit the pump area. If you have parts that fit, it seems logical to try.
Quote:
Obviously it'd be easier to explain with pictures but having seen this epoxy I think it's going to be worth a small investment as a trial run to see if it's better than the thread locker I got and do it all properly with pictures then
Now I need to find a UK supplier for that epoxy...
The stuff was pricey, but 50ml is prbably enough to do 100 or more carts easy. If you want me to buy one and forward it on to you, I'd be happy to.
Monty
|
| Sun Mar 29, 2009 10:54 pm |
|
|
Martin
Site Admin
Joined: 30 Apr 2002
Posts: 4132
Location: South Yorkshire, UK
|
xiphmont wrote:I blew into the bag through the ink port to puff it out as far as it would go, resealed it, then drilled. Doing it all very slowly by hand, I had all the control I needed, and I'm 8 for 8 so far. I should probably add that to the instructions. The pictures for that part are 'staged' so the bag had already deflated a bit.
Ah... I learned that best to flush out first the hard way... When I did the blow up routine the first time I got blow back.. plus ink!!.. Much to my wifes amusement... 
Quote:Quote:My approach is via the filling port (snip)
I tested that idea out on a scratch cartridge, and even trimming flush to the frame it looked like it would be a very tight fit. If I used a striaght adapter, the tubing didn't have clearance to bend without kinking, and with an elbow, it looked like I couldn't screw it down because it would hit the pump area. If you have parts that fit, it seems logical to try.
Yeah... a straight in adaptor is a complete waste of time as you found... An elbow only works if you have a very low profile one and I found the one I linked to, purely by chance.. It's part of the reason I sell it now as it saves some folks the hassle I had.
The trick is to widen the port just slightly but you have to be very careful not to let the drill bite down too far and cut through the wall of the fill port which narrows further down.
Quote:Quote:Now I need to find a UK supplier for that epoxy...
The stuff was pricey, but 50ml is prbably enough to do 100 or more carts easy. If you want me to buy one and forward it on to you, I'd be happy to.
That would actually be a big help... I've held off on mass producing the CIS kits I've been building because of the glue issue so yes I'd appreciate that... Likewise if you'd like to try some of these elbow fittings let me know..
_________________ Printers: (Canon) MP500/830, MX700, iP4000/4200/4300/4500/5200, iX4000(A3) (Epson) C84/86, D88, CX6600, R285/800/1900 (HP) K550, K850, K5400, L7680
|
| Sun Mar 29, 2009 11:05 pm |
|
|
xiphmont
Clued up
Joined: 28 Mar 2009
Posts: 69
Location: Somerville, MA USA
|
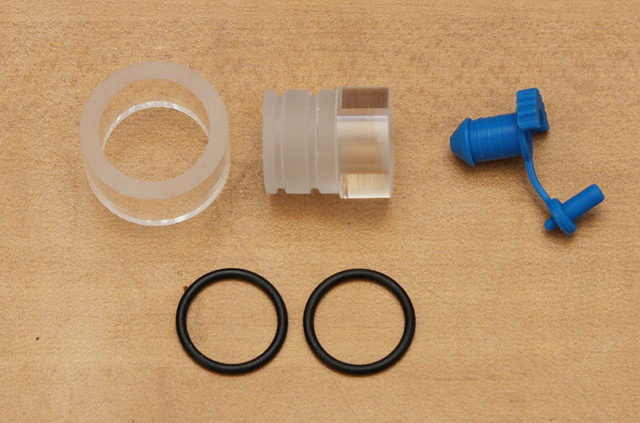
Ink reservoirs
An ink reservoir can be just a bottle with a tube, but I want a reservoir that cuts off flow when the ink runs out so the system doesn't suck air. That way the HP's built in 'no really, I'm out of ink' mechanism will still work. My solution is to make a reservoir with a simple float. When the ink runs out, the float hits bottom and seals against a gasket.
I could have come up with something much simpler, but I decided to make something completely from scratch. I'm not going to go into detailed instructions because I don't think anyone else would really want to go to these lengths, but I hope our friends in Chinese manufacturing are reading this, in order to see what some of their customers really want.
Here's all the parts for the reservoirs, newly machined and fresh out of the tempering bath.

Last edited by xiphmont on Wed Apr 01, 2009 9:27 am; edited 2 times in total
|
| Wed Apr 01, 2009 8:58 am |
|
|
xiphmont
Clued up
Joined: 28 Mar 2009
Posts: 69
Location: Somerville, MA USA
|
Ink reservoirs
A closeup of the parts for the top plug. I could have just glued a cap on, but I wanted this to be disassemblable just in case something goes wrong with my design and the float gets stuck. The blue silicone plug was left over from one of the prebuilt CIS systems I bought that was too badly made to use (but the plug is nice).
|
| Wed Apr 01, 2009 9:01 am |
|
|
|
|
The time now is Sat Apr 27, 2024 1:51 pm | All times are GMT + 1 Hour
|
|
Page 3 of 7
|
You cannot post new topics in this forum
You cannot reply to topics in this forum
You cannot edit your posts in this forum
You cannot delete your posts in this forum
You cannot vote in polls in this forum
|
|

85058 Attacks blocked
|
|